How to integrate DeepSeek into Microsoft Excel (Step-by-Step)

Integrate DeepSeeks in MS Excel using VBA
In this blog post, you’ll discover how to seamlessly integrate DeepSeek into Microsoft Excel using VBA. By following this guide, you’ll be able to harness the power of the DeepSeek API right within your spreadsheets, enhancing your data analysis capabilities.
DeepSeek is a powerful tool that allows users to access advanced data analysis capabilities right within their spreadsheets. Integrating DeepSeek with Microsoft Excel unlocks a new realm of possibilities for data manipulation and retrieval. This integration allows users to input queries directly into Excel and receive instant responses, making it a valuable asset for professionals who rely on data-driven decisions.
With the DeepSeek API, you can create customized formulas that cater to your specific needs. Whether you’re looking to extract information, generate reports, or analyze trends, DeepSeek offers a seamless experience. In this section, we will explore how to set up the DeepSeek formula in Excel, ensuring you can harness its full potential.
Setting Up Your DeepSeek Formula
The first step to leveraging DeepSeek in Excel is to set up your formula correctly. This involves creating a custom function that communicates with the DeepSeek API. The formula I designed is called “DS_Chat”, and it allows you to input prompts and receive responses directly in your spreadsheet.
To get started, you’ll need to ensure that you have the necessary modules downloaded. These modules will serve as the backbone for the DeepSeek functionality in Excel. Once you have everything ready, you can begin the integration process.
Downloading Required Modules
Before diving into the integration, you must download the required modules. There are two essential modules needed for this process:
- JSON Converter: This module is crucial for handling JSON data, which is the format used by the DeepSeek API.
- DeepSeek Module: This is the custom module I created specifically for integrating DeepSeek with Excel.
Once you’ve downloaded these modules (DOWNLOAD LINK), you’re ready to move on to the next step.
Activating the Developer Tab
To integrate DeepSeek into Excel, you need access to the Developer tab. This tab is not visible by default, so you’ll need to enable it. Here’s how:
- Right-click on any part of the ribbon in Excel.
- Select Customize the Ribbon.
- In the dialog that appears, check the box next to Developer.
- Click OK to save your changes.

Now, you should see the Developer tab on your ribbon, giving you access to the tools needed for VBA integration.
Importing Modules into Excel
With the Developer tab activated, you can now import the downloaded modules into Excel. Follow these steps:
- Open a new workbook in Excel.
- Click on the Developer tab and select Visual Basic.
- In the Visual Basic for Applications (VBA) editor, right-click on your project in the Project Explorer.
- Select Import File and navigate to where you downloaded the JSON Converter and DeepSeek Module.
- Import both files into your project.
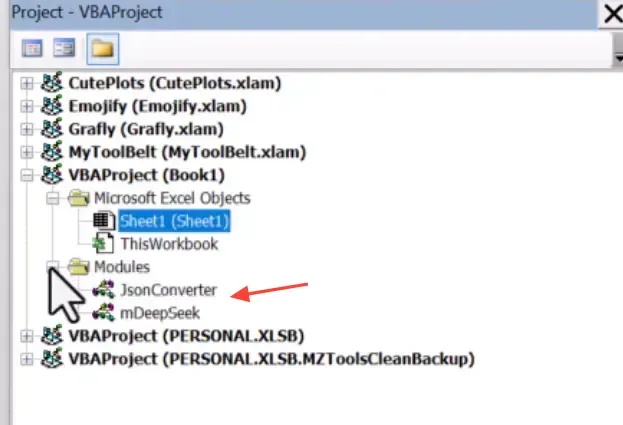
This step ensures that the necessary code is now part of your Excel workbook, allowing you to use the DeepSeek functionality.
Compiling Code and Activating References
After importing the modules, the next step is to compile the code and activate the necessary references. This process is crucial to ensure that everything runs smoothly:
- In the VBA editor, go to the Debug menu and select Compile VBAProject.
- If you encounter any error messages, it may indicate that a required reference is not activated.
- To activate the reference, go to Tools > References.
- In the list that appears, look for Microsoft Scripting Runtime and check the box next to it.
- Click OK to confirm.
Once you’ve compiled the code and activated the necessary references, you’re ready to proceed with obtaining your DeepSeek API key.
Obtaining Your DeepSeek API Key
The final step in setting up your DeepSeek integration is to obtain your API key. This key is essential for authenticating your requests to the DeepSeek API. Here’s how to get it:
- Visit the DeepSeek platform at platform.deepseek.com.
- Log into your account. If you don’t have one, you’ll need to create it.
- Navigate to the API Keys section.
- Create a new API key, naming it something relevant like Excel Integration.
- Copy the API key to your clipboard for later use in your Excel workbook.
With your API key in hand, you are now fully equipped to integrate DeepSeek into your Excel environment, ready to harness its capabilities for your data analysis needs.
Testing Your DS_Chat Formula
Once you have set up the DS_Chat formula, it’s time to put it to the test. Testing your formula ensures that everything is functioning as expected. Begin by entering a simple prompt, like “What is the capital of France?” and hit enter. You should see the response appear in the adjacent cell.
If the formula responds correctly, it confirms that your integration is successful. However, if you encounter an error, double-check your API key and ensure that the DeepSeek module is properly imported. Remember, troubleshooting is part of the process.
Some (fun) prompts for inspiration
- What is the capital of Japan?
- Tell me a joke about Excek.
- Generate a travel itinerary for a week in Spain.
- What is the largest mammal in the world?
Making the Formula Available Globally
To enhance your productivity, you can make the DS_Chat formula available across all your Excel workbooks. This is achieved by saving the formula in your Personal Macro Workbook. First, open a new workbook and navigate to the Developer tab. Here, you need to record a macro and choose the option for the Personal Macro Workbook.
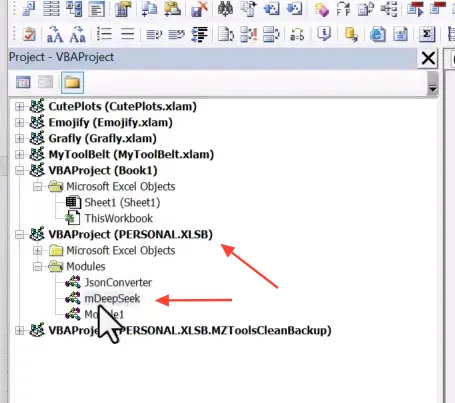
After recording, you’ll find a new file named Personal.xlsb. Open this file in the Visual Basic Editor and import the necessary modules. This step ensures that your DS_Chat formula becomes globally accessible.
Once you’ve completed these steps, save the changes. From now on, you can use the DS_Chat formula in any new or existing workbook simply by typing Personal.xlsb!DS_Chat followed by your prompt.
Utilizing Cells for API Key Flexibility
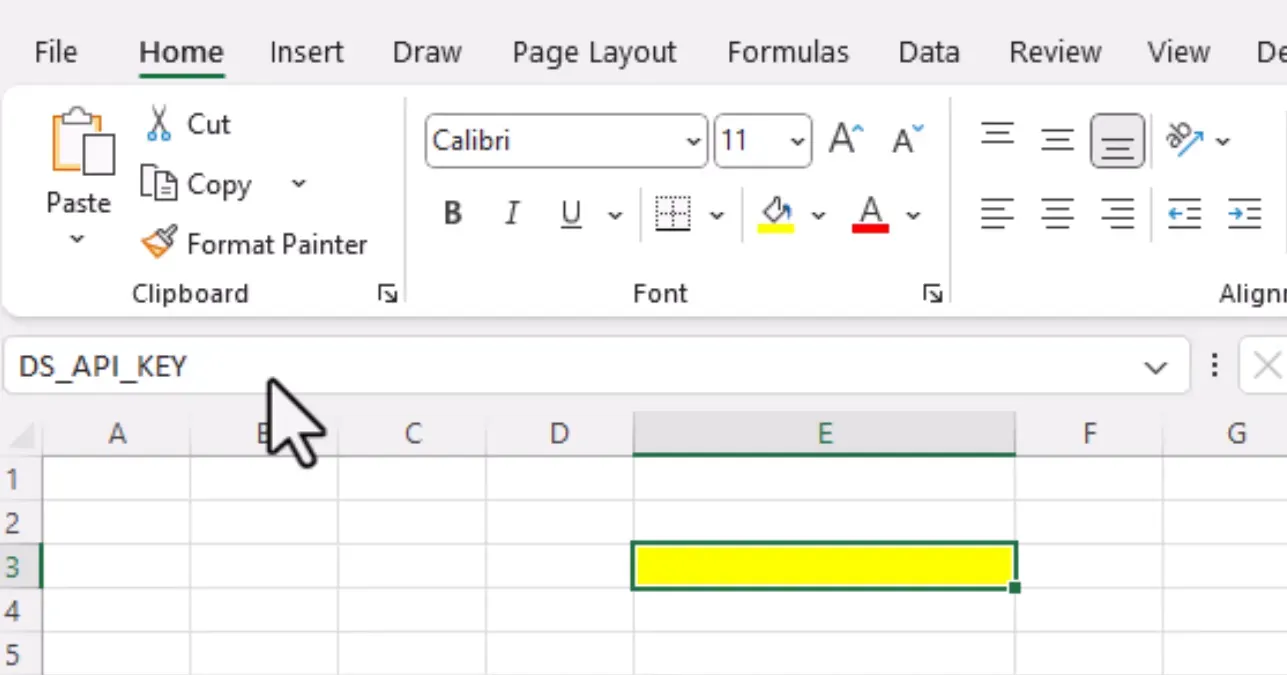
Hardcoding your API key directly into the code limits flexibility. Instead, I recommend storing your API key in a specific cell within your workbook. This way, you can easily update it without diving into the code every time. Select a cell, name it DS_API_Key, and reference this name in your DS_Chat formula.
To test this setup, enter an invalid string in the cell where your API key resides. You should see an API error. Once you replace it with your actual key, the formula should execute correctly, demonstrating the flexibility of this approach.
Customizing Parameters in Your Formula
The beauty of the DS_Chat formula lies in its customization options. You can refine the parameters to better suit your needs. For instance, you may want to adjust the model, temperature, or maximum tokens used in the API call. This customization can significantly affect the quality and type of responses you receive.
To customize the parameters, simply include them in your formula, separating each by a comma. For example:
=Personal.xlsb!DS_Chat("Tell me a story", "model", "temperature", "max_tokens")Experimenting with different values will allow you to fine-tune the outputs, making the DS_Chat formula an incredibly powerful tool for data analysis and content generation.
Limitations and Final Thoughts
While the DS_Chat formula is a fantastic asset, it is important to understand its limitations. Currently, this integration only works on Windows and within the desktop version of Excel. It is not compatible with Excel Online or Mac versions due to the reliance on VBA.
Additionally, the performance of the API is contingent on your account’s balance. Regularly check your usage on the DeepSeek platform to avoid interruptions. Lastly, be mindful of the types of queries you submit, as overly complex requests may lead to longer response times or errors.
Despite these limitations, the DS_Chat formula opens a world of possibilities for data analysis within Excel. Its ability to generate responses based on natural language input is a game-changer for professionals seeking to enhance their productivity.
Conclusion
Integrating DeepSeek into Microsoft Excel with the DS_Chat formula is an empowering step for anyone looking to leverage advanced data analysis tools. From easy testing to global accessibility, the customization options available allow you to tailor the experience to your specific needs. As you explore this integration, remember to keep an eye on your API usage and adjust parameters as necessary to optimize performance.
Further Links
Thanks for reading.