I created a FREE ChatGPT Excel add-in 🤯

Introduction
I’m thrilled to share my latest project with you: the MyToolBelt Excel add-in, which brings the power of AI right into your spreadsheets! With the integration of ChatGPT into this add-in, I created a feature called the AI Companion that allows you to ask questions based on your cell selections. While it’s free and user-friendly, note that it’s currently only available for Windows and requires an OpenAI API key, which incurs a small cost when used.
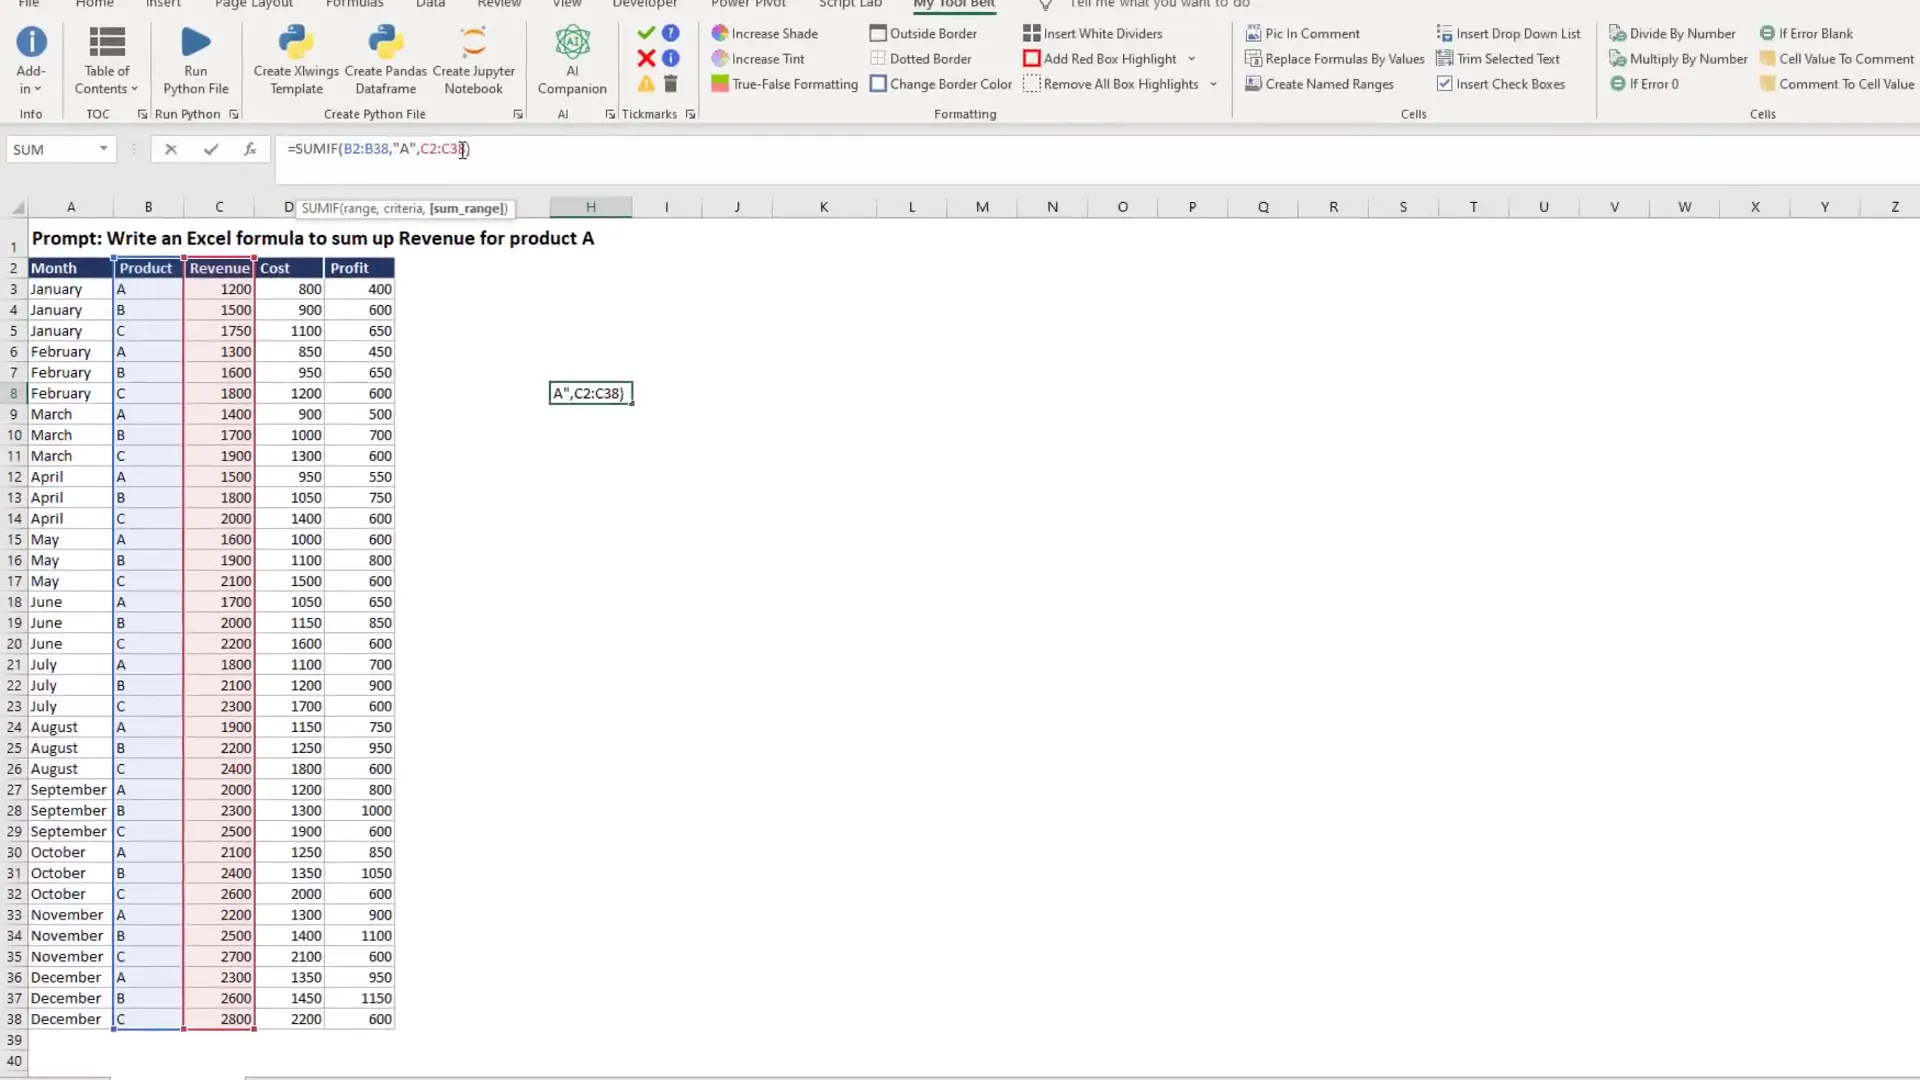
Excel Formulas Example (SumIf)
Let’s start with a practical example! I have financial data for various products from January to December, and I want to sum the revenue for Product A. After selecting the relevant cell range, I click the AI companion button. A message appears, showing the AI’s recommendation to use a SUMIF formula. I copy this formula, and it automatically includes the correct cell range for summing Product A’s revenue.
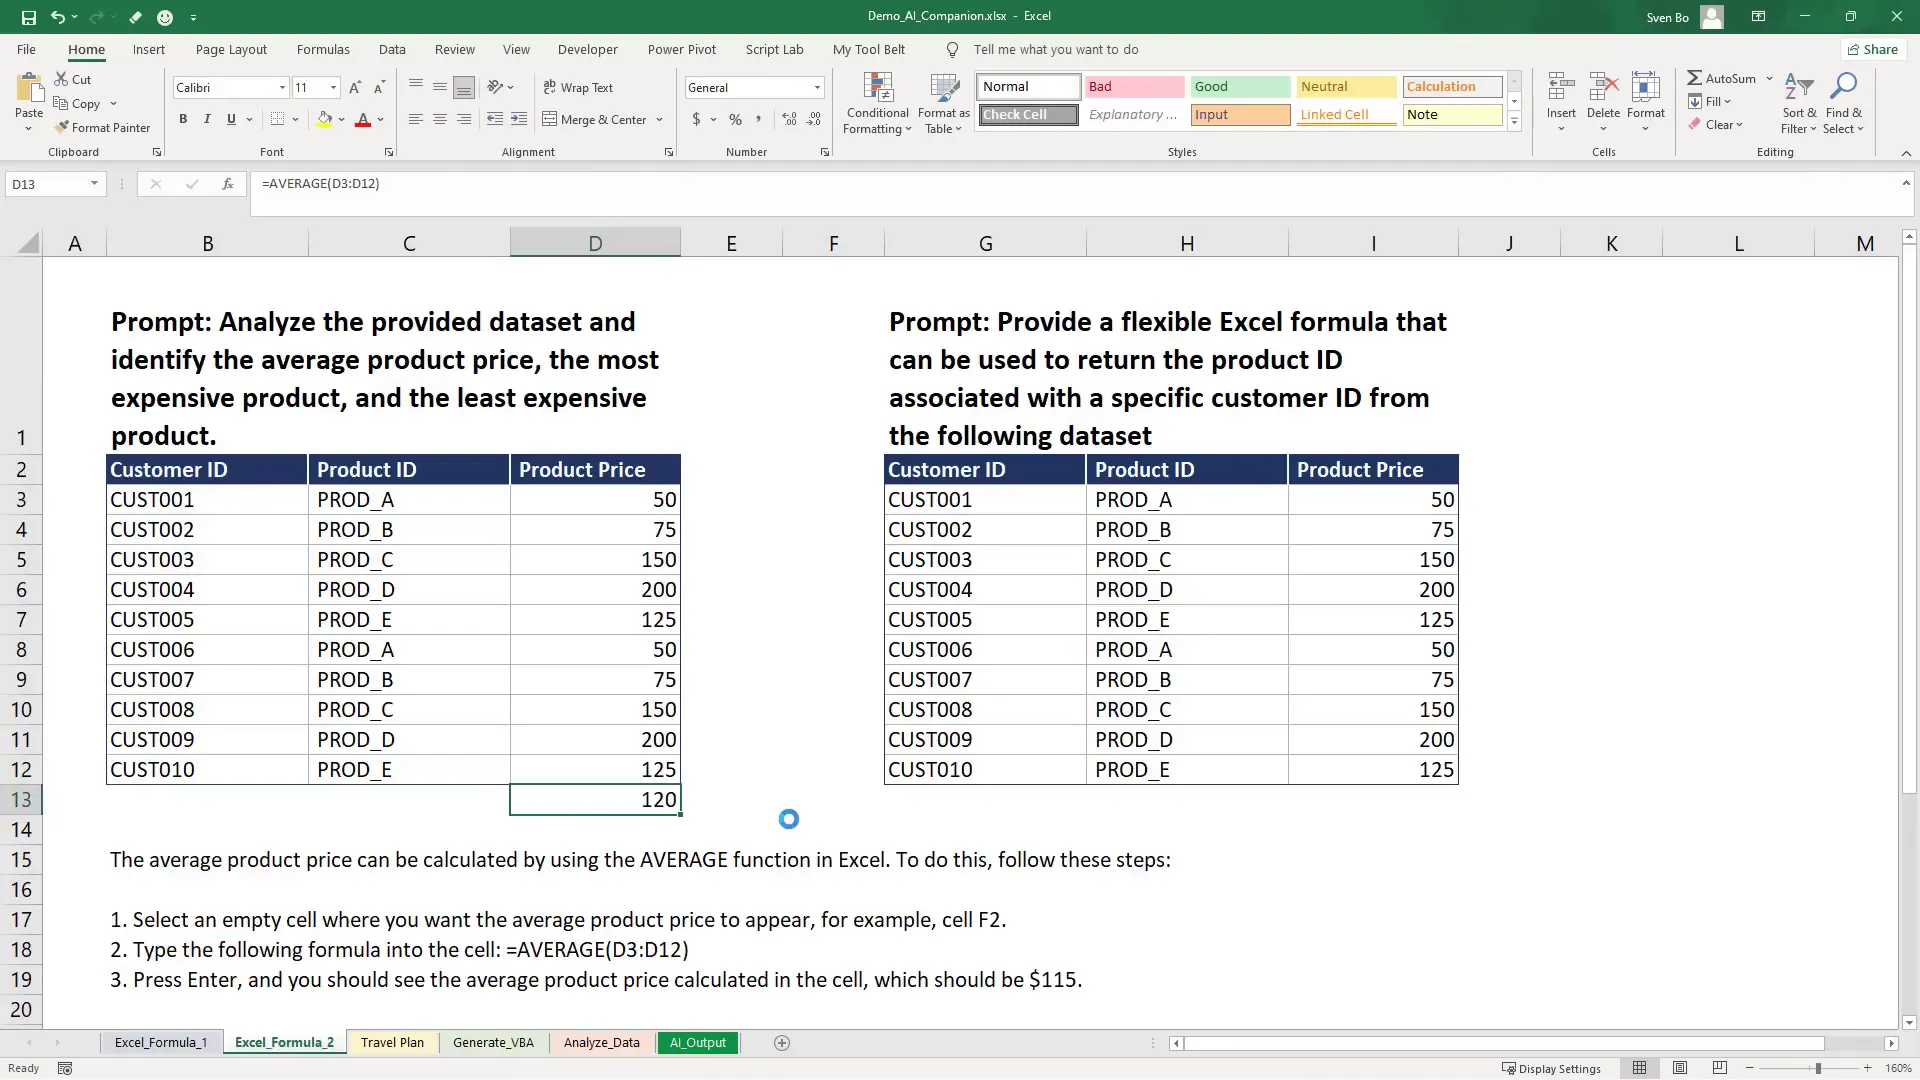
Excel Formulas Example (Average, Max, Min)
Next, I want to find the average product price, the most expensive product, and the cheapest product. Again, I select my data and click the AI companion button. The AI suggests using the AVERAGE formula, which I find to be slightly inaccurate in the explanation provided. However, for the most expensive product, the AI recommends the MAX formula, which correctly identifies the product price as $200. The MIN formula also works well, indicating Product A as the cheapest at $50.
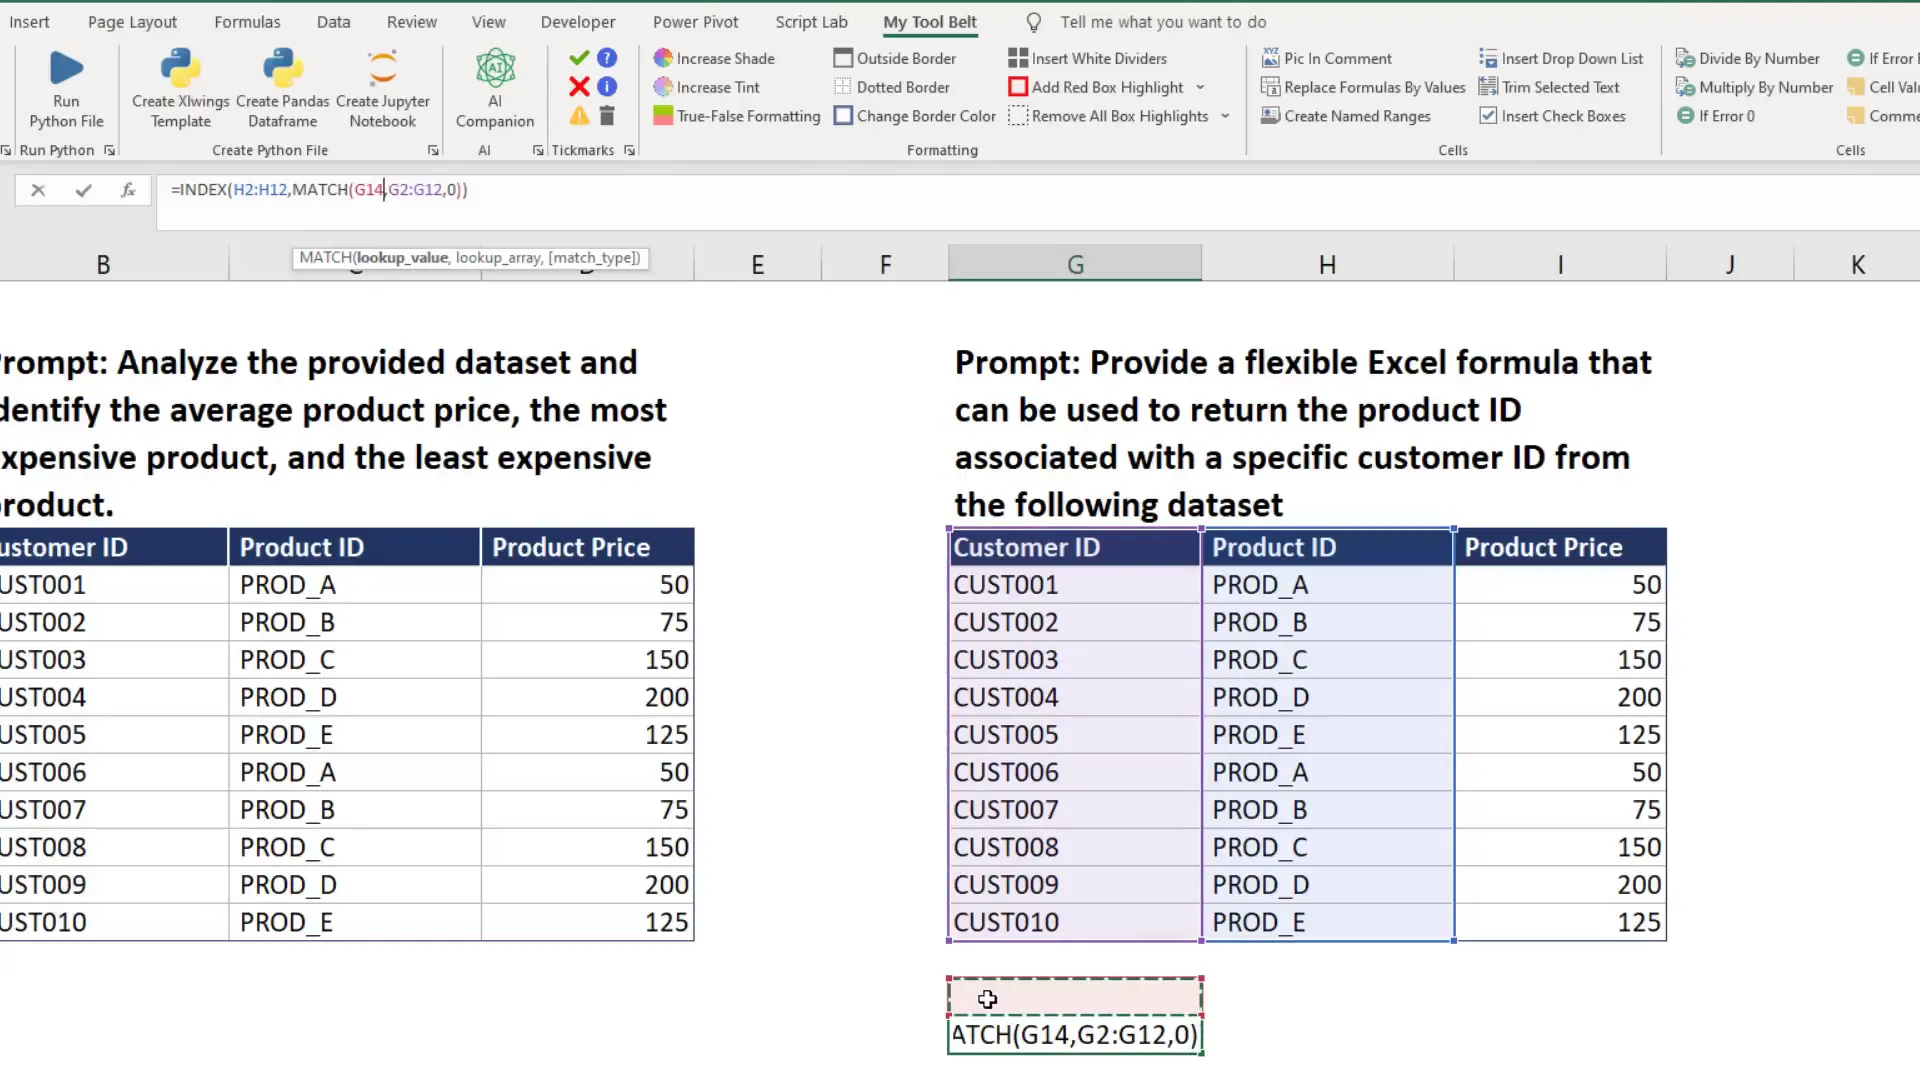
Excel Formulas Example (Index, Match)
Now, I’ll demonstrate a more advanced formula. This time, I want to return the product ID associated with a specific customer ID. Again, I select the data and click the button. The AI suggests an INDEX and MATCH formula, which I test. The formula starts with a single quote, so I need to copy it without that quote to use it properly. I modify it to refer to a cell instead of a fixed customer ID and create a drop-down field for customer IDs.
Travel Plan Example
You’re not limited to formulas; you can ask the AI any question! For instance, I requested a 1-week travel plan for Sri Lanka, including a packing list. I selected a cell and clicked the button. A message box appeared since I didn’t include the keyword “prompt” in my selection, but the AI still generated a complete travel plan for me.

Using the Prompt Keyword
For better results, I recommend starting your requests with the keyword “prompt.” This is especially useful when referring to multiple cells, as it helps the AI extract the prompt more effectively. In my travel plan example, I clicked “Yes” to continue and received a detailed plan.
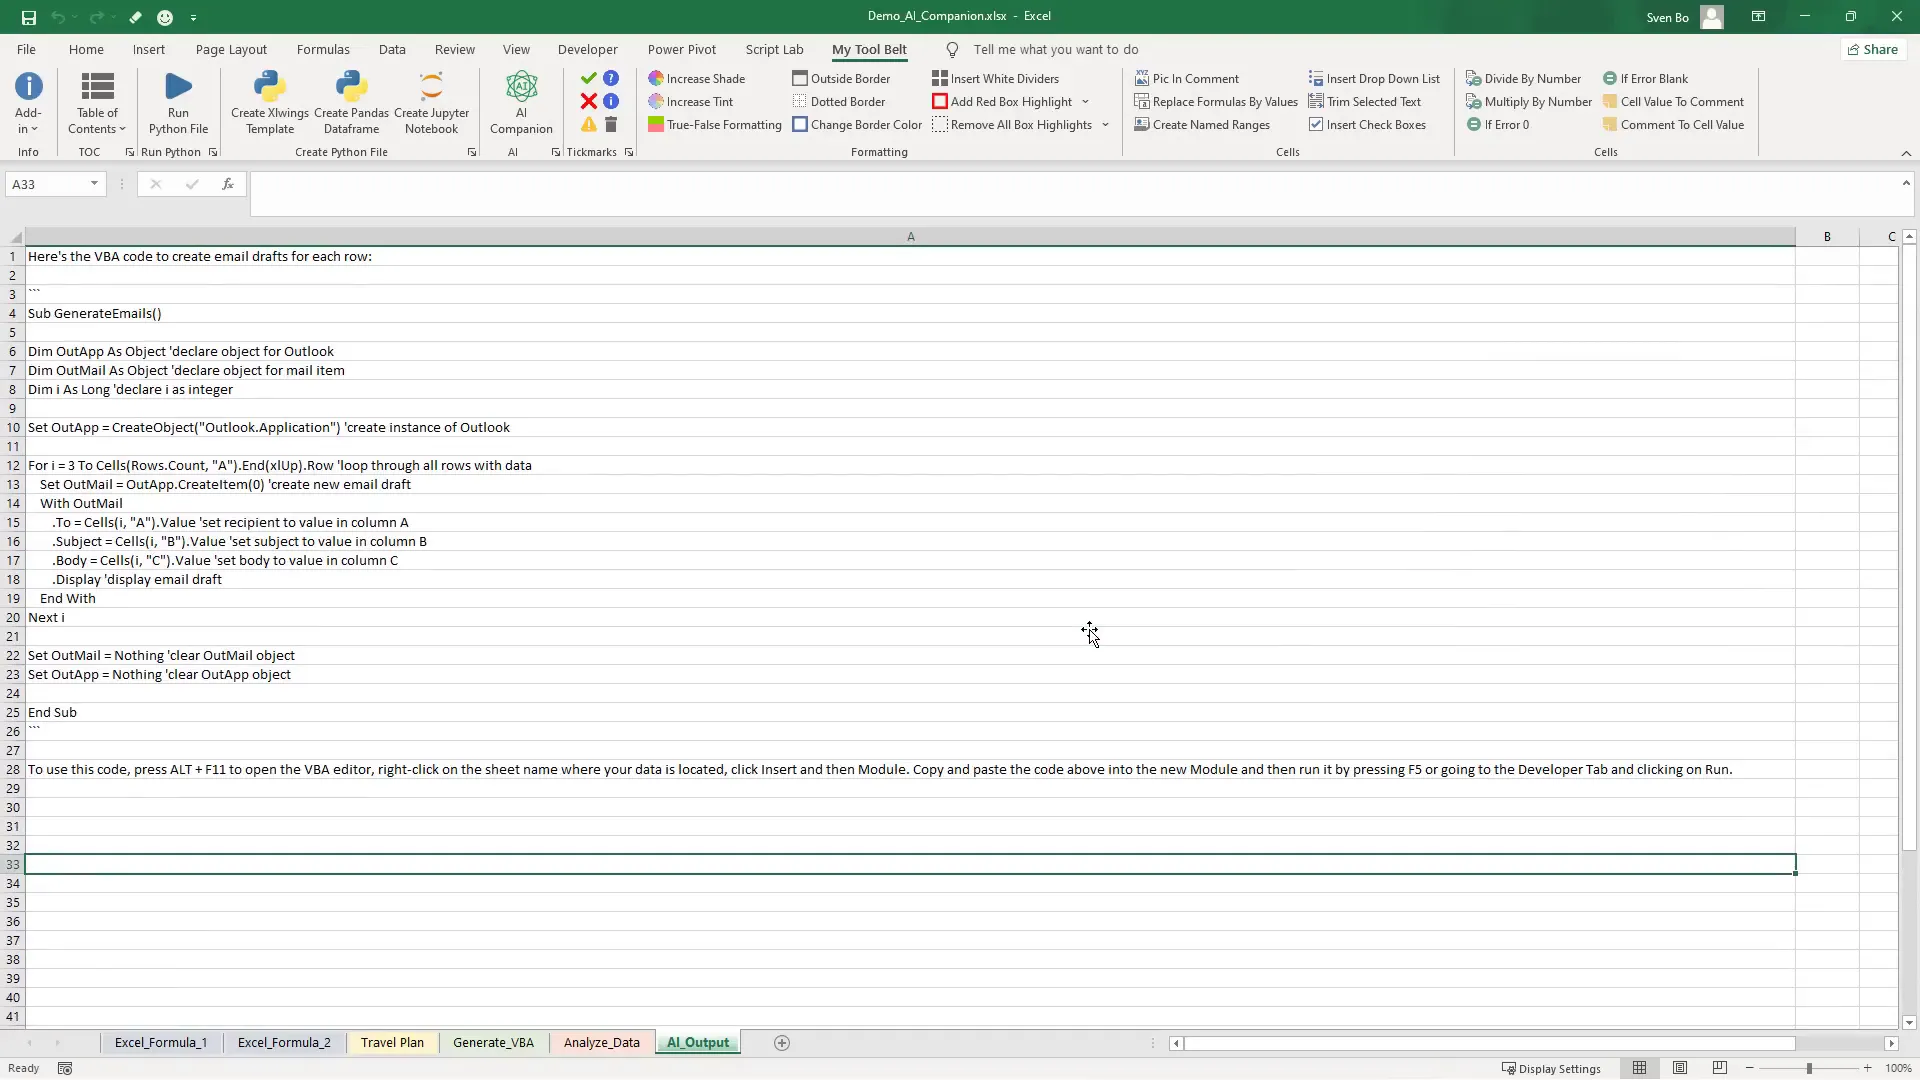
VBA Code Generation Example
Next, I wanted to generate VBA code for creating Outlook emails from Excel. I kept my prompt simple, asking for code that drafts emails for each row. After selecting the relevant cells and asking the AI, I received the code along with explanations. I copied it into the VBA editor and found that it included helpful comments for each line, making it easy to understand.
Excel Data Analysis Example
In another instance, I asked the AI to analyze my data and provide key insights. After selecting my cells and clicking the button, I received insights in a new sheet. While some insights were correct, others were inaccurate, highlighting the importance of cross-checking AI responses before making business decisions.

An Important Hint
While the AI Companion can provide impressive results, it’s crucial not to blindly trust its outputs. Always validate the information, especially when it comes to significant business decisions.
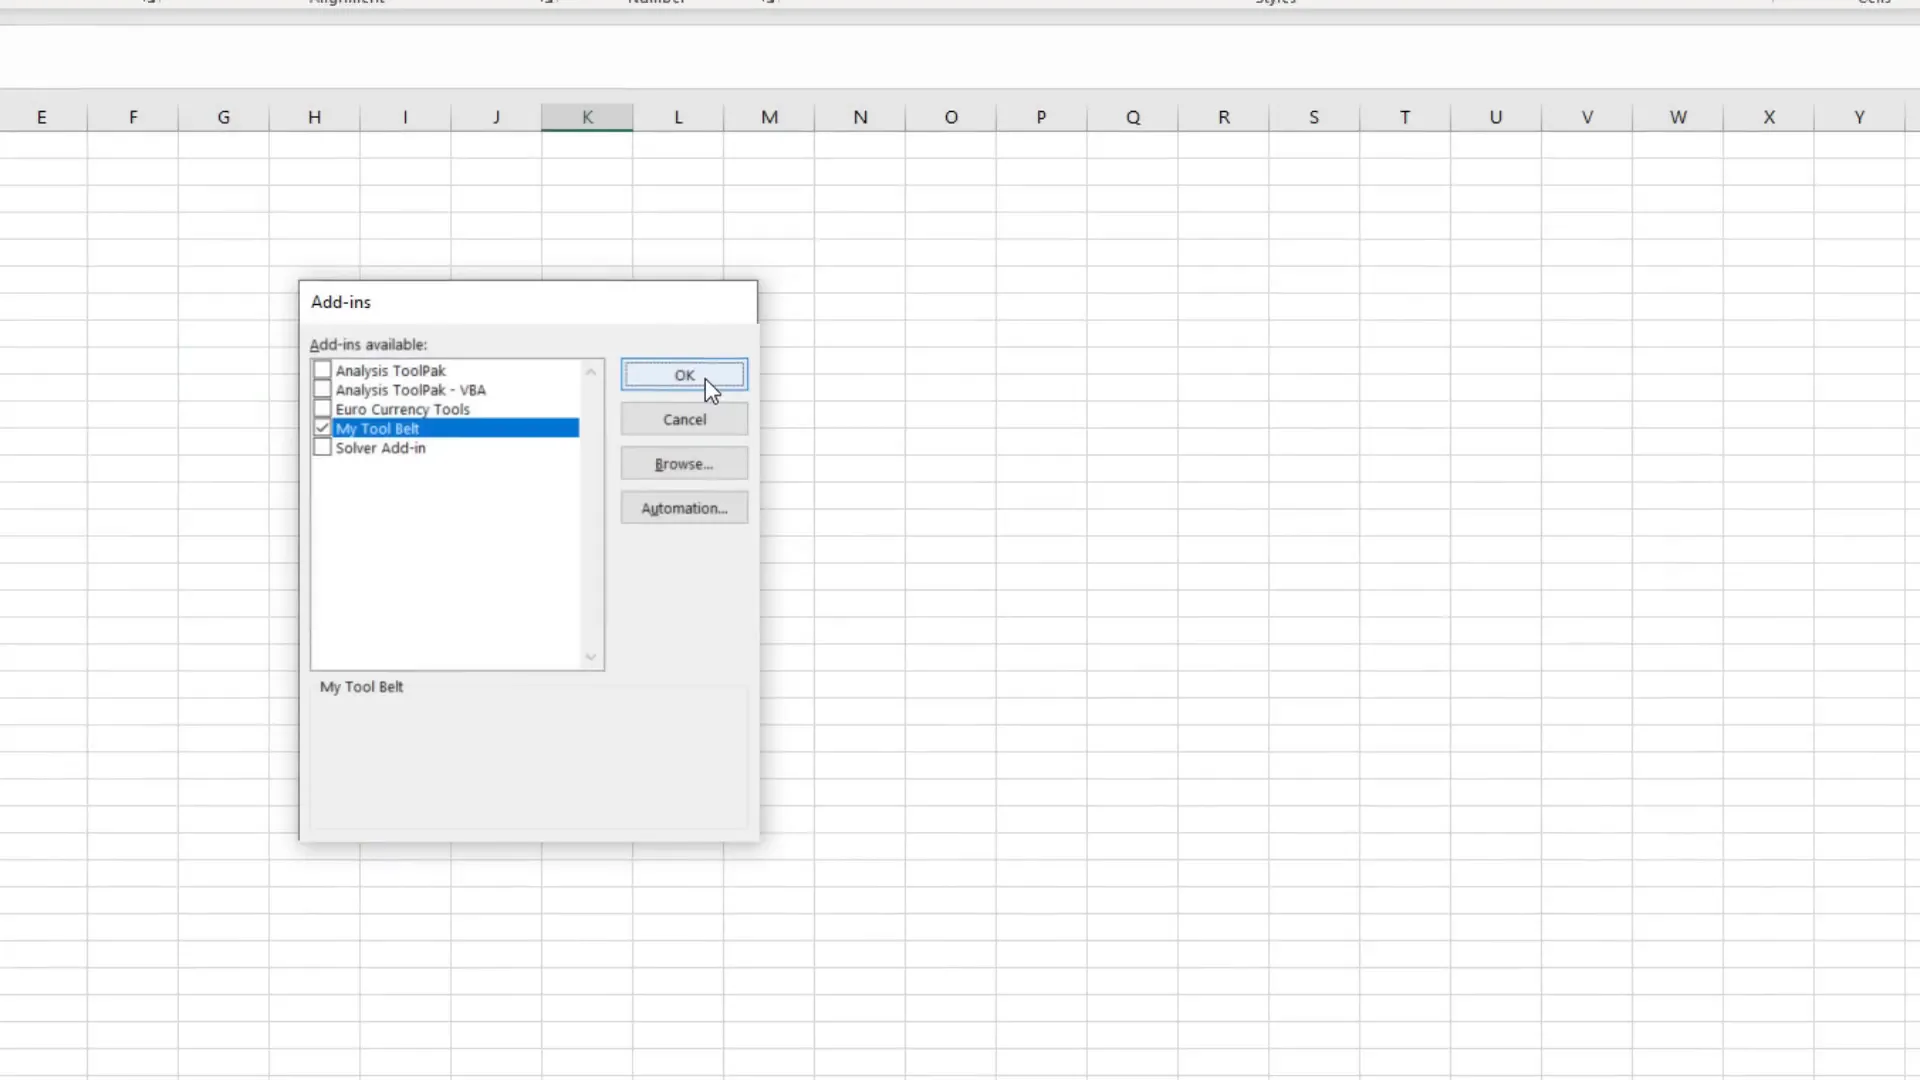
Installing the Add-In
To install the MyToolBelt add-in, download it from my website. After downloading, extract the archive and follow the installation instructions provided in the email. Navigate to Excel’s Add-Ins section, browse for the add-in file, and ensure it’s checked to activate it.
Updating the Add-In
If you have an older version of the add-in, you can update it by selecting “Check for Updates” in the MyToolBelt menu. Follow the prompts to download the latest version and replace the old file in the Excel Add-Ins section.
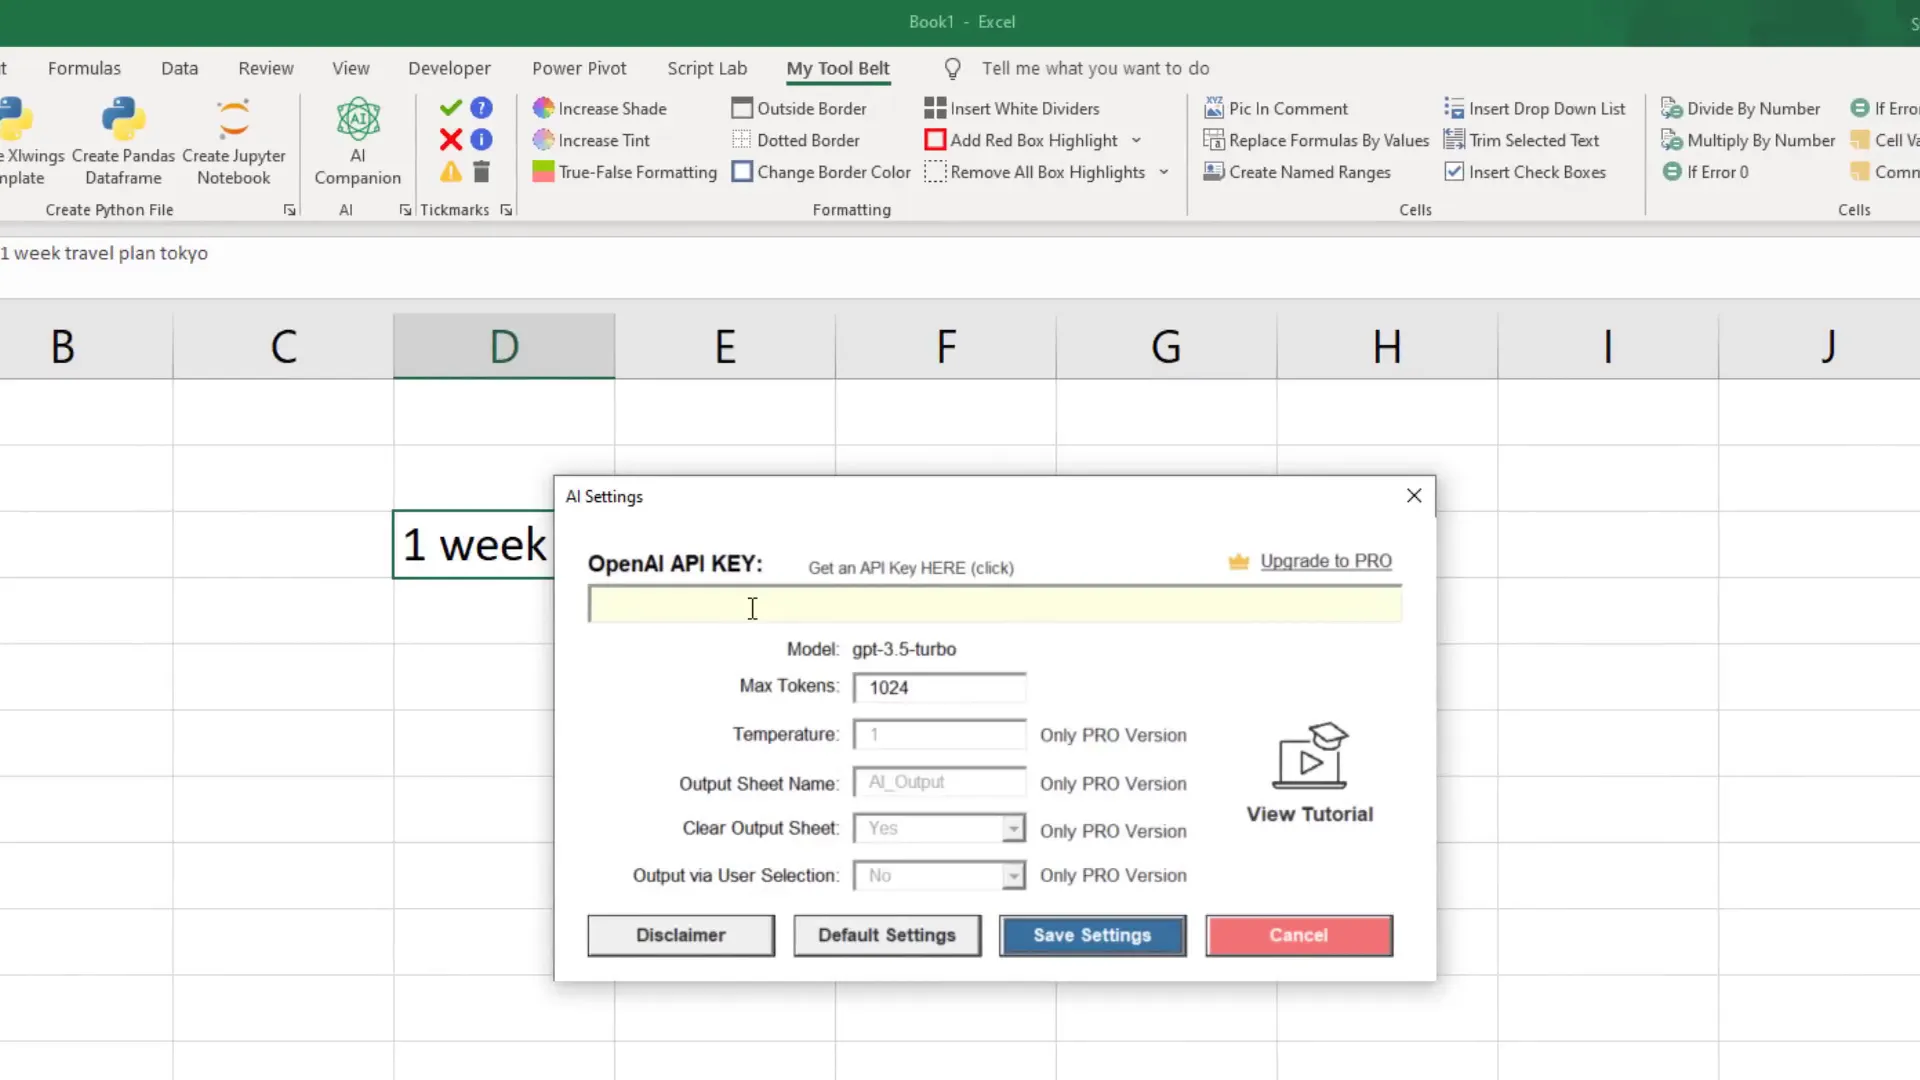
Setting up the AI Companion
To use the AI Companion feature, you’ll need an OpenAI API key. Sign up on the OpenAI website, create a new key, and paste it into the settings window in Excel. Set up a payment method under the billing section to avoid errors when using the API.
Additional settings & benefits of the Pro Version
The Pro version of the add-in unlocks additional features, including advanced settings for controlling the AI’s response length and creativity. You can also convert data ranges into pandas dataframes or Jupyter notebooks with the Pro version.