Free Excel Data Entry Form Template (No VBA, No Install)
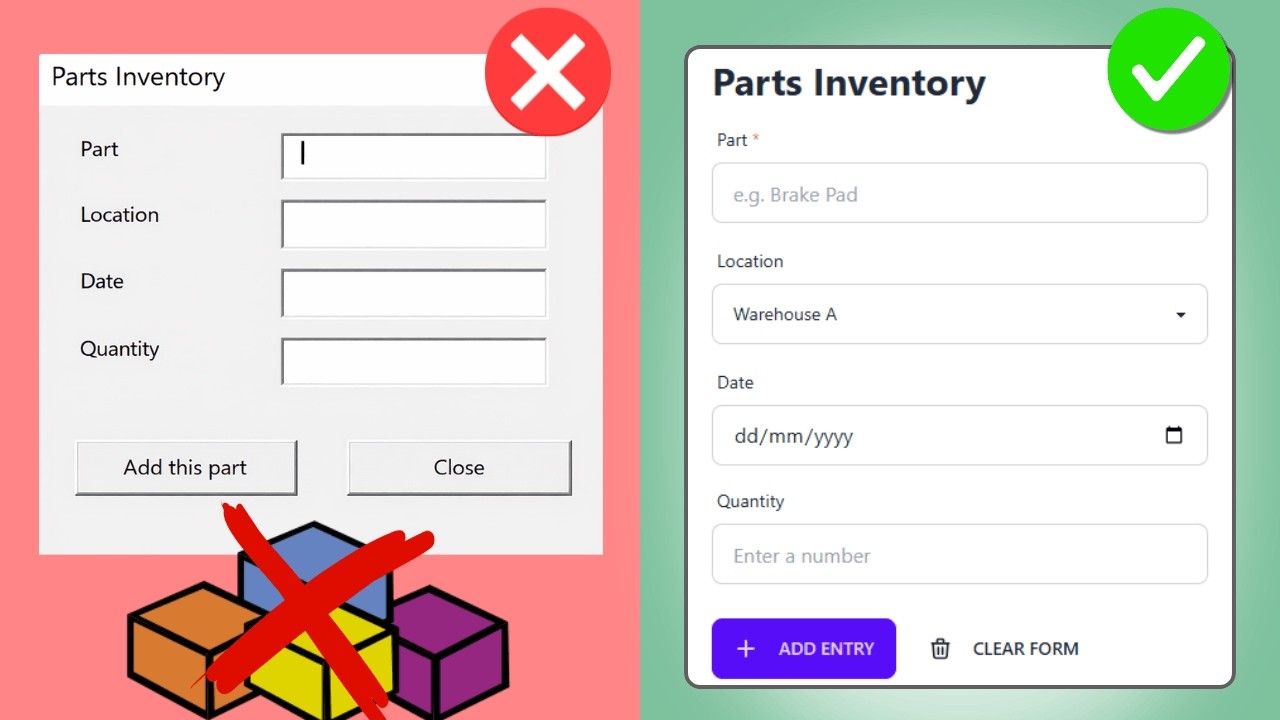
Looking for a free Excel data entry form you can just download and start using? No VBA, no macros, no installation. In this post I will show you how to get a fully working data entry form that saves directly to Excel, complete with dropdowns, date pickers, checkboxes, collapsible sections, and even conditional logic. You can build one from scratch in about two minutes using the free online form builder.
Table of contents
- What is the Excel Data Entry Form Builder?
- How do you build a form with the drag-and-drop builder?
- What field types are available?
- How do sections keep your form organized?
- How does conditional logic work?
- How do you download and open the form?
- How does the form save data to Excel?
- Can you edit or delete entries?
- Does the form builder save your progress?
- How does this compare to VBA UserForms and Microsoft Forms?
- What are the limitations?
- What if you need more control with Python?
What is the Excel Data Entry Form Builder?
It is a free online tool that lets you design a custom data entry form using drag and drop. You build your form in the browser, click download, and get a standalone HTML file that saves entries directly to an Excel spreadsheet on your computer. There is no VBA involved, nothing to install, and no account to create. The form runs locally on your machine, so none of your data ever leaves your computer. It works in Chrome, Edge, Opera, and Brave. The form builder supports text inputs, email fields with validation, phone numbers, URLs, number fields, date pickers, textareas, dropdowns, radio buttons, and checkboxes. On top of that, you can organize fields into collapsible sections and set up conditional logic so that certain sections only appear based on what the user selects. Open the Form Builder
How do you build a form with the drag-and-drop builder?
You drag field types from the left panel into the form area on the right. Click on any field to configure its label, placeholder, helper text, and whether it is required. The form builder takes care of the rest. For example, to build a property inspection form, you would drag in a text input for the inspector name, a date picker for the inspection date, another text input for the property address, and a dropdown for the inspection type. Each field gets configured individually by clicking on it. 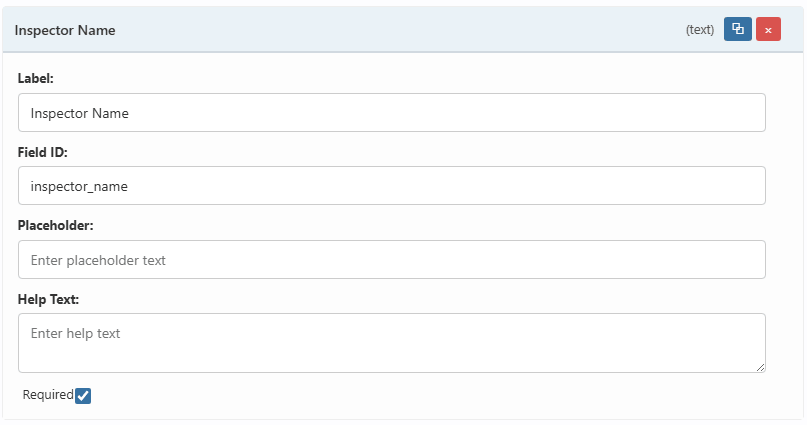 As you type each label, the form builder automatically generates a clean field ID. So “Inspector Name” becomes “inspector_name”. This ID is what becomes the column header in your Excel file. You can also adjust it manually if you prefer a different naming convention.
What field types are available?
The form builder supports 10 different field types that cover most data entry scenarios. You can mix and match them however you want and arrange them in any order. Here is the full list:
- Text Input – for names, addresses, or any free text
- Email Input – includes built-in email format validation
- Phone Input – for phone numbers
- URL / Website – for web links
- Number Input – only accepts numeric values
- Date Input – opens a calendar date picker
- Textarea – for longer text like notes or descriptions
- Select (Dropdown) – single selection from a list
- Radio Buttons – single selection, all options visible
- Checkboxes – multiple selections from a list
For dropdowns, radio buttons, and checkboxes, you define the options directly in the builder. Each option has a label (what the user sees) and a value (what gets saved to Excel). By default, the value auto-fills based on the label in lowercase with underscores.
How do sections keep your form organized?
Sections let you group related fields together under a named header. Users can expand or collapse each section, which keeps the form clean even when it has a lot of fields. To add a section, just drag the “Section” element from the left panel into your form. Give it a name, then drag other fields directly into the section. You can choose whether each section starts expanded or collapsed by default. For the property inspection example, I created a “Room Conditions” section with radio buttons for the overall condition and checkboxes for any issues found. This keeps the inspection details neatly separated from the basic info fields at the top. 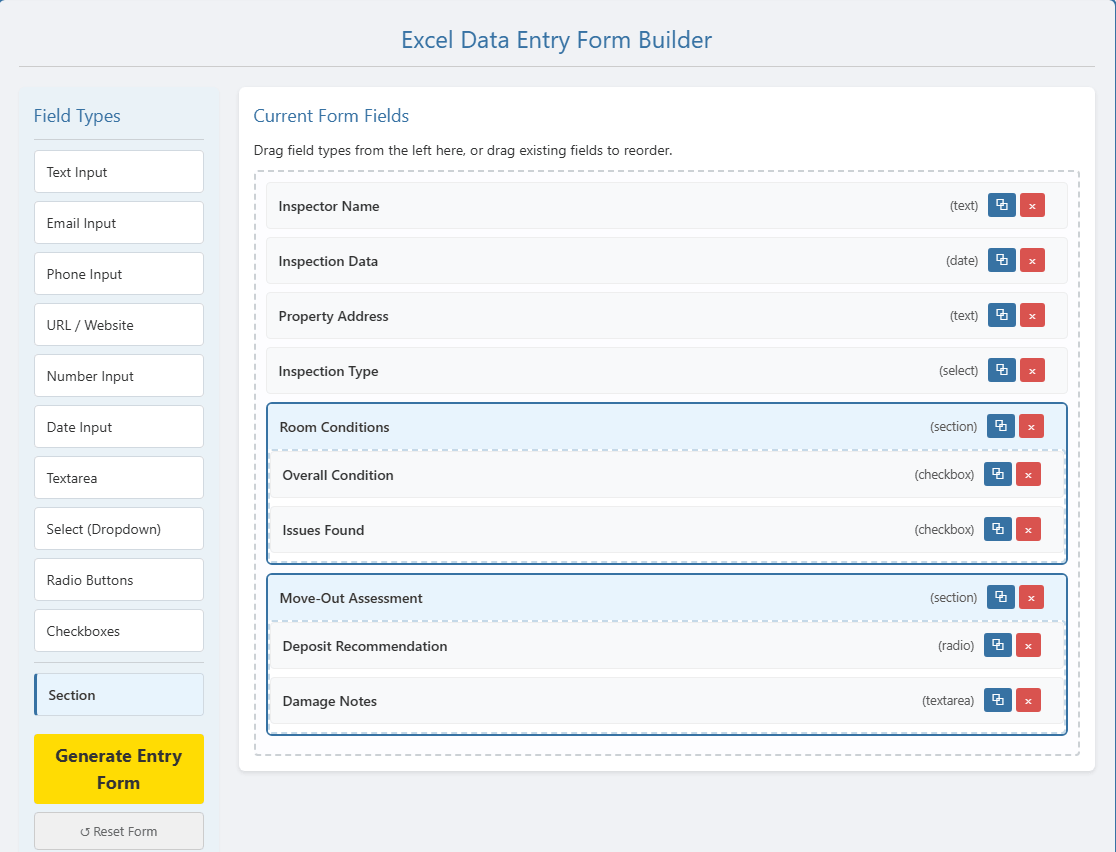
How does conditional logic work?
Conditional logic lets you show or hide an entire section based on what the user selects in another field. This way the form only displays fields that are actually relevant. For example, in the property inspection form, there is a “Move-Out Assessment” section that only appears when the inspection type is set to “Move-Out”. For a routine inspection, those deposit and damage fields would just be clutter, so they stay hidden. To set it up, click on the section, check “Show only when a condition is met”, and configure three things:
- Field – which field to watch (e.g., Inspection Type)
- Condition – the operator (equals, does not equal, contains, is empty, is not empty)
- Value – the value to match (e.g., “move-out”)
One important detail: the value must match the option value, not the option label. So if your dropdown label says “Move-Out” but the stored value is “move-out”, you need to use “move-out” in the condition. 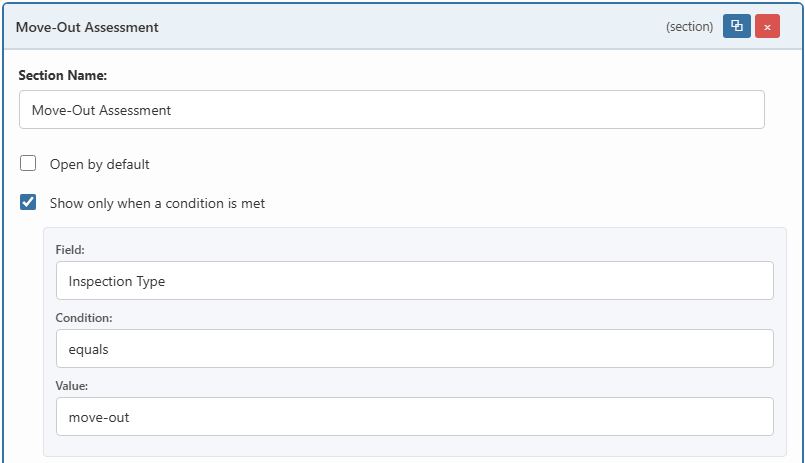
How do you download and open the form?
Once your form is ready, click the “Generate Entry Form” button. Set a title and description for your form, then click the green download button. You get a single HTML file. To open the form, just double click the downloaded file. It opens in your browser and is ready to use immediately. The file is completely standalone. You can put it on your desktop, a USB stick, or any folder. No internet connection is needed after downloading. And just to be clear: even though this is an HTML file that opens in a browser, all your data stays on your machine. Nothing is sent to any server.
How does the form save data to Excel?
When you fill out the form and click “Add Entry”, the data gets saved directly to an Excel spreadsheet on your computer. The form uses the browser’s File System Access API to read and write the file. The first time you add an entry, the form asks you where to save the Excel file. After that, every new entry gets appended automatically without asking again. Your field labels become the column headers in the spreadsheet, and a timestamp column gets added automatically. For conditional sections, the columns still exist in Excel even when the section was hidden. They just stay empty for that entry. So a “Routine” inspection will have blank deposit columns, while a “Move-Out” inspection will have those filled in. 
Can you edit or delete entries?
Yes. All entries show up in a table at the bottom of the form. You can search, edit, or delete any entry directly from the form without having to open Excel. Click the edit button on any row and the form fills in with the existing data. Make your changes and click “Update Entry”. The spreadsheet gets updated immediately. To delete, click the trash icon and confirm. There is also a search box above the entries table. Start typing and the results filter in real time. 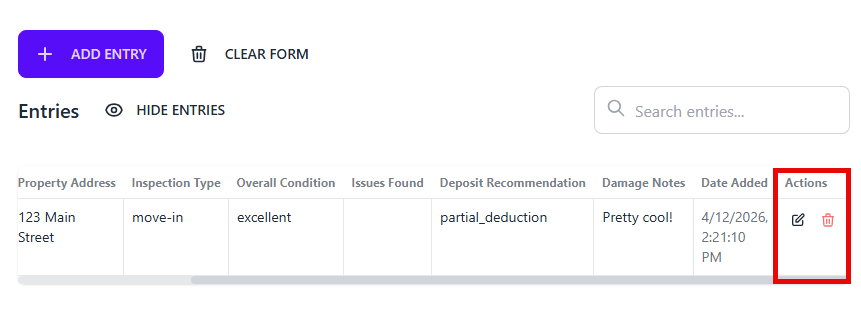
Does the form builder save your progress?
Yes. The form builder automatically saves your work to the browser’s local storage. If you refresh the page or close the tab, your form design is still there when you come back. This was added in version 2.1 after users reported losing their forms on page refresh. Now all your fields, sections, conditions, and form settings get saved automatically every time you make a change. If you want to start fresh, just click the “Reset Form” button in the left panel.
How does this compare to VBA UserForms and Microsoft Forms?
Here is a quick comparison of the three main approaches to creating data entry forms for Excel.
| Feature | This Tool | VBA UserForms | Microsoft Forms |
|---|---|---|---|
| Coding required | None | VBA code | None |
| Saves directly to Excel | Yes | Yes | Export needed |
| Date picker | Yes | Extra add-in | Yes |
| Conditional sections | Yes | With code | Yes |
| Works offline | Yes | Yes | No |
| Modern UI | Yes | No | Yes |
| Data stays local | Yes | Yes | Cloud |
| Setup time | 2 minutes | 30+ minutes | 5 minutes |
The main advantage over VBA UserForms is that you get a modern looking form without writing any code. And unlike Microsoft Forms, your data saves directly to an Excel file on your computer instead of going through the cloud.
What are the limitations?
The form works well for single-user data entry, but there are a few things you should know before getting started. Browser support: Only Chromium-based browsers are supported. That means Chrome, Edge, Opera, and Brave. Firefox and Safari do not support the File System Access API that the form uses to read and write Excel files. Single user: The form is designed for one person at a time. It is not built for multiple people writing to the same Excel file at the same time. Excel formatting: If you connect the form to an existing workbook, custom formatting like colors, borders, and formulas might not survive when the form writes new rows. It is better to keep the entries in a separate workbook and pull the data into your formatted workbook using VBA or Power Query. Reconnecting: If you refresh the page or close the browser, you need to reconnect to your Excel file using the connect button. The form design and settings are preserved automatically, but the file connection is not.
What if you need more control with Python?
If you need full coding control over your form, there is also a Python-based form builder that generates a standalone desktop application. The Python Excel form builder works the same way. You design your form with drag and drop, then click a button. But instead of an HTML file, you get a Python file that creates a desktop GUI application. You can modify the code, add custom validation, or build in any business logic you need. You can even compile the Python form into a standalone executable so that other people can use it without having Python installed on their machine.
Get started
The form builder is free, there is nothing to install, and you can have a working form in about two minutes. Just open it in your browser, drag in your fields, and download. Open the Excel Data Entry Form Builder