
Next to Send now sits Schedule: pick a date and time, confirm, and the whole campaign is handed to Twilio immediately, marked to go out later. Twilio holds and releases the messages server-side, so your PC can be off at send time.
What scheduling needs #
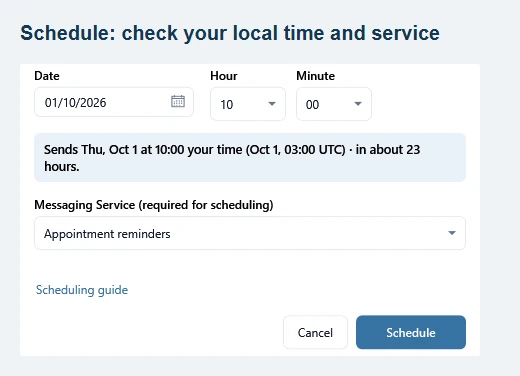
- A Messaging Service. Twilio only schedules through one, whatever sender is chosen for normal sends. The schedule dialog lets you pick it; create and configure its sender pool in the Twilio console before scheduling.
- A time between 15 minutes and 35 days ahead. Twilio’s own window; the dialog enforces it and shows the time in your local timezone.
Check the time and service #
Choose the date and time in your PC’s local timezone. Read the local-time and UTC summary, select the Messaging Service, then confirm. Leave a buffer beyond 15 minutes so Twilio receives the request within its allowed window.
While a send is scheduled #
Scheduled messages appear in History with the Scheduled status and their release time. Before the release time, select the rows and click Cancel scheduled. Refresh the statuses to confirm cancellation succeeded; a message already being sent may be too late to cancel. After release they behave like any other send, delivery tracking included.
Test mode and scheduling do not mix: with test mode on, nothing would actually be handed to Twilio, so the app asks you to switch it off first rather than pretending to schedule.