
AI Categorizer only ever answers with one of your categories, or Other. This page covers the two ways to give it your categories, and the rules the list has to follow.
From a range #
Use this when the list already exists in a workbook, such as a chart of accounts, a cost center list or a topic list.
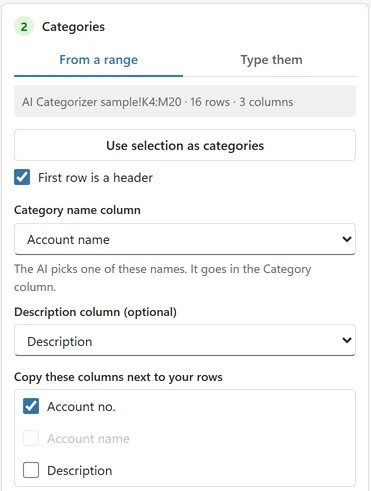
- Choose From a range and click one cell in the list. The add-in takes the whole block around it, with its headers.
- Pick the category name column, for example “Account name”. These names are what the AI chooses from and what the Category column shows.
- Optionally, pick a description column. A description tells the AI what belongs in the category, for example “SaaS, cloud apps, licences”. Descriptions longer than 200 characters are cut, and the pane tells you so.
- Optionally, tick columns to copy. For each row, the add-in copies the values of these columns from the chosen category’s line into new columns named
<column> (category), each in its own column, for example the account number, a cost center or a tax code. For a chart of accounts, the account number is ticked for you. They are filled in inside Excel, never sent. You can tick or untick them after a run: the next run adds or removes those columns next to the results without using credits.
A category name longer than 60 characters is not cut: the pane stops and names the row, so you can shorten it in the sheet.
Type them #
Use this for a short list you do not keep in a sheet. Choose Type them: every category gets its own numbered row with a name field and an optional description field, for example the name Price with the description cost, discounts, value for money.
- Add category adds a row. Enter moves from the name to the description, and from the last description to a new row. The x next to a row removes it.
- To paste a list, copy it in Excel (the name column, with the description column next to it) and paste it into a name field: each line becomes its own row.
- A name with a colon followed by a space is flagged: put that part in the description field.
The typed list is saved in the workbook, so it is there the next time you open the file. It travels with the file, so anyone you share the workbook with can see it.
Allow Other when nothing fits #
With Allow Other when nothing fits on (the default), a row that fits none of your categories gets Other instead of the least bad category. Turn it off only when every row must get one of your categories; the rows that fit badly then show up as low confidence and Review instead. See Why did a row get Other?
Rules for the list #
| Rule | Limit |
|---|---|
| Categories per run | Up to 100 |
| Category name | Up to 60 characters |
| Description | Optional, up to 200 characters |
| Question | Optional, up to 300 characters |
| Whole list | Names and descriptions together up to 6,000 characters. The pane shows how much of it you use. |
- Duplicates that differ only in capital letters or spaces are merged into one category before anything is sent, with a note.
- Near duplicates, such as “Invoice” and “Invoices”, get a warning. You can run anyway, but the AI will split rows between them.
- Reserved words: yes, no, true and false cannot be category names. The pane says “{label}” cannot be a category name. Rename it. With Allow Other on, a category called Other is not allowed either, and the pane says Turn off Allow Other, or rename the category “{label}”.
If the list is too long, see Category list is too long.
Your setup is remembered #
The add-in remembers the rows, the ticked columns, where the categories came from and the question for each workbook, so next month’s export in the same workbook needs only a click on the new rows.