
This guide takes you from installing SendCommander to sending your first message. The video below walks through the whole thing, and the same steps are written out underneath it.
What the video covers #
The video shows an earlier version. The written steps below describe version 1.4, including Compose and cautious sending. The player has chapters so you can jump to a topic.
- 0:05 Install from the Microsoft Store
- 0:49 Link your WhatsApp account
- 1:12 Window lock and privacy blur
- 1:33 Adding contacts
- 1:59 Preparing your import file
- 2:44 The import wizard
- 5:14 Contact manager and WhatsApp groups
- 5:40 Choosing your recipients
- 6:19 Crafting a safe message
- 7:15 Variations and placeholders
- 8:43 Campaign name and sending pace
- 9:57 Sending your messages
- 10:23 Block list and message history
- 11:18 Pro version: license and features
The same steps in writing #
Step 1: Install from the Microsoft Store
SendCommander installs from the Microsoft Store in one click, and updates itself from there whenever a new version ships. You need Windows 10 or 11.

Click Get on the Store page. Windows installs the app and adds it to your Start menu, so you can also open it later by typing “SendCommander” in the Windows search bar.
Step 2: Link your WhatsApp account
Every message goes out from your own WhatsApp account, so the app has to be linked to it once.
- Open SendCommander from the Start menu. On the first launch you get a welcome screen.
- Open the WhatsApp screen in the left sidebar.
- On your phone, open WhatsApp > Linked devices > Link a device. On Android, Linked devices is usually in the three-dot menu; on iPhone, look under Settings.
- Scan the QR code shown in SendCommander. The status turns green once you are logged in.
Trouble with the QR code? See Login issues.
The WhatsApp window inside SendCommander is locked by default, so clicks do not go through to it. There is normally no reason to interact with it, so leaving the lock on is the safer setting. If you do want to click in it, untick Lock WhatsApp window on that page. You can also switch on Privacy blur there to hide your contacts and chats.
Step 3: Add your contacts
Open the Contacts page. You can add people one by one, or import them from a CSV, Excel or vCard file by dragging the file into the import area. If you are not sure how the file should look, save the example import file from that same page and edit it.
Only one column is required: the phone numbers. Headers are optional. Ideally you also bring a name and any other detail you have, because those are what let you personalize each message later.
Dropping the file in starts a short import wizard:
- Headers and preview. Confirm whether your file has header names and check the preview of your data.
- Phone number column. SendCommander tries to find it by name. If the auto detection picks the wrong one, choose it from the dropdown.
- Country. If your numbers are local rather than international, pick the country they belong to. The built-in validator uses that to check and clean them up. It only checks that a number looks correct, not whether it is on WhatsApp.
- Extra columns. Choose which additional details to import, such as name or company. Deselect anything you do not want.
- Existing contacts. Decide what happens to numbers you already have: Update (the default, so re-importing an edited file refreshes them), Skip, or add them anyway, which is rarely what you want because it creates duplicates.
- Lists. Optionally assign the contacts to an existing list, or type a name to create a new one. Lists are how you later send different messages to different groups of people, and you can change them afterwards in the contact manager.
After the import your people appear in the contact manager, where you can right-click any contact to edit their details.
Use Send myself a test on Compose. Your number is remembered and filled in next time, but you still confirm it. You can also set it in Settings.
Step 4: Choose who receives the message
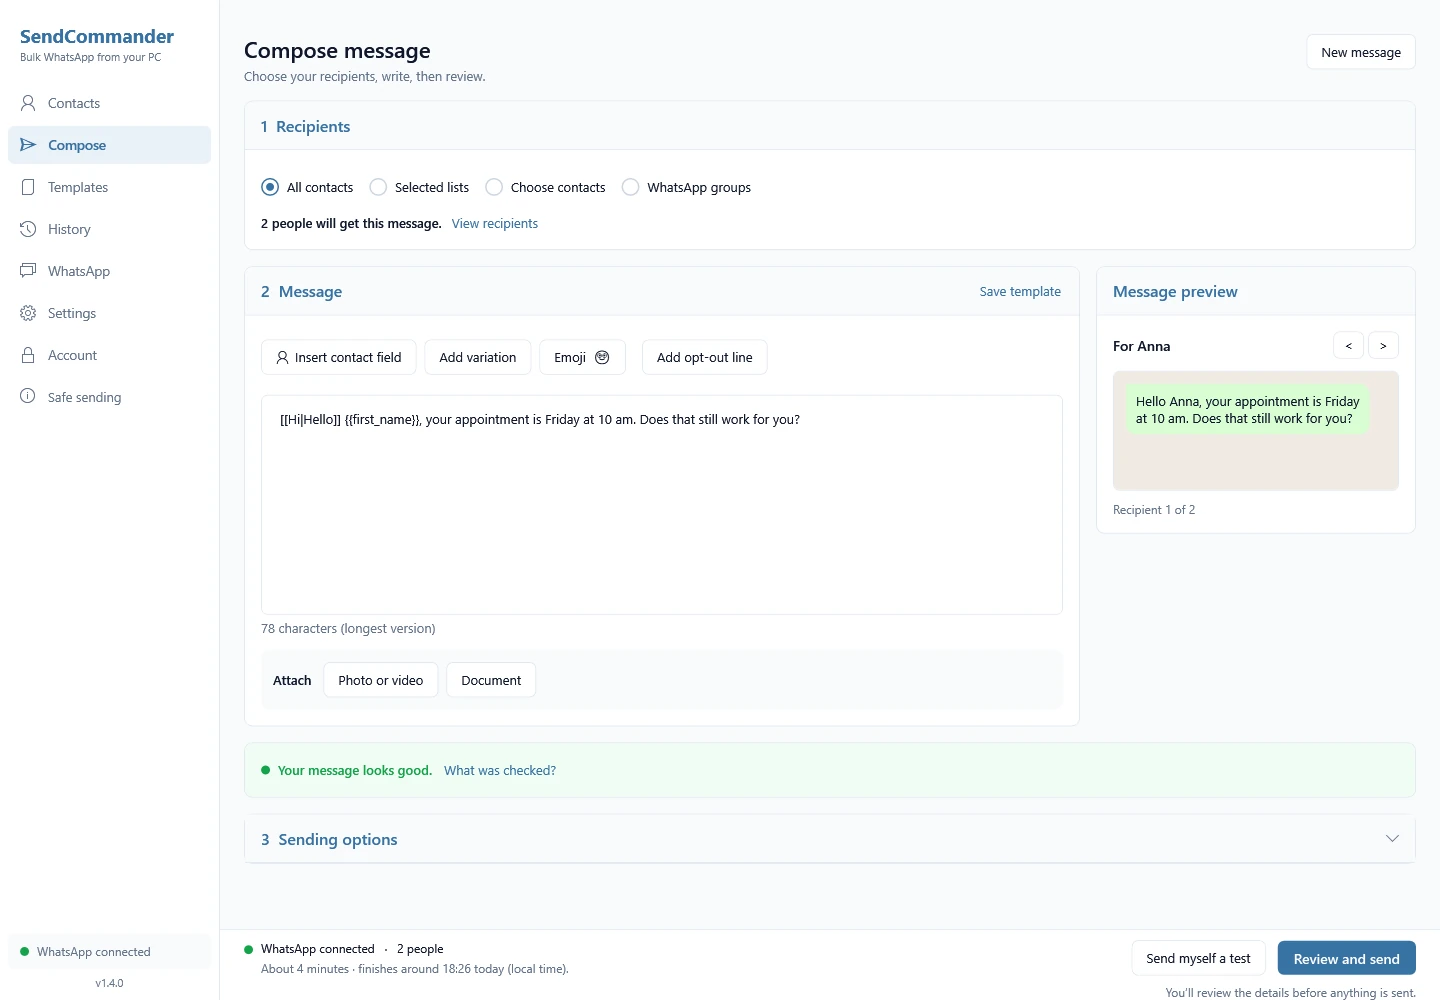
Open the Compose page. You can send to all your contacts, to one or more lists, to contacts you pick by hand (with filters by list or by any detail), or to WhatsApp groups.
For groups, open WhatsApp groups on the Contacts page and type the group name. It has to match the name in WhatsApp exactly, otherwise the message can land in the wrong chat.
Step 5: Write and preview your message
Write a message each recipient expects and check the personalized preview. Contact fields and variations can make it relevant, but neither feature guarantees protection from WhatsApp restrictions.
- Variations use double square brackets with a pipe between the options, like
[[Hi|Hello|Hey]]. SendCommander picks one at random per message. - Placeholders use double curly braces and pull in the details you imported, like
{{first_name}}. You can add a fallback after a pipe for people with no name, like{{first_name|there}}. Leave the fallback out and nothing is inserted.
The preview in the top right corner shows what individual people would really receive, so click through a few before you send.
While you type, the message check below the editor reviews your message and suggests what to improve. You can still send while a warning is showing, but it is there for a reason. See Message check for what it looks at.
Optionally give the send a campaign name, which lets you filter for it later in your history.
Step 6: Set your sending pace
Open Sending options > Sending pace. Cautious sending is on by default: up to 20 outgoing messages per rolling hour and 100 per rolling 24 hours, spaced at least three minutes apart.
Adjust limits lets you lower those limits or spread the send over longer. Custom timing turns the cautious limits off and offers a pause or duration. Neither mode guarantees protection from restrictions.
Schedule start is a separate Pro option. Manual batches are optional if you want to review a small group’s results before sending the next one. Natural typing is in Settings > Sending.
Check the estimated duration and local finish time beside the send buttons. Texts, attachments, tests and earlier sends on this PC affect cautious limits. Keep the app open and your PC awake; minimizing is fine.
Step 7: Send, then check the result
Click Review and send. Check the recipients, sending account, attachments and timing, then use the arrows to review individual message previews. Confirm to begin. You can pause or stop a running send.
After an interruption, the app can restore recipients who were not attempted for another review. It does not restart sending automatically. Check History and WhatsApp before retrying uncertain results. A restored draft is separate from this recovery: New message clears your current draft, with Undo available.
Numbers that are not on WhatsApp are detected automatically and shown on the result screen, where you can add them to the block list in one click. Blocked numbers stay in your contacts but are skipped on every future send, and you can review them under Contacts and Block numbers.
Everything you send is kept in History, including the failures. Double-click a row for the details, and add a note to yourself if you want one.
The free version includes 100 personalized text messages (once per computer, they do not renew). To unlock unlimited sending, attachments, templates and scheduled starts, enter your license key on the Account page (it is in your order confirmation email) and click Activate. You can cancel a subscription from that same page.
What Pro adds
- Attachments. Send photos, videos or documents with your message, one or several at a time.
- Scheduling. Set a time for a send. Because it runs from your PC, SendCommander has to be running when that time comes.
- Templates. Save a message under a name and pick it from the dropdown on Compose whenever you need it again.
Before your first big send, please read the guidelines for safe sending. They explain pacing, recipient expectations and opt-outs; no setting guarantees protection from restrictions.
Installing when the Microsoft Store app is blocked
If the Microsoft Store app is unavailable, try the official Store listing in your browser. A browser installer may still be subject to your organization’s installation policy; contact IT if installation is blocked.
https://pythonandvba.com/go/sendcommander-install
Open that page, click Install (or Download), run the file it saves, and carry on from Step 2 above. You get exactly the same app with the same license key, and updates still arrive automatically.